[UPDATE 2014]The original hello world application was simplified by the PhoneGap team. We adapted our own demo to be as close as possible to the original one. As a result some of the descriptions of this article are a bit outdated. Most of it is still valid though, so you can safely go on reading.[/UPDATE]
As a JavaScript guy and mostly-OS-agnostic kind of person I wait for the day when I will be able to fully exploit the power of ApplicationCache and other new JS APIs such as GeoLocation and IndexedDB, to install the same web application and have the same OS-integrated experience on my Windows notebook, my Sabayon box or on my Android Smartphone. Not to mention the pleasure of sharing the exact same app with my iOS, Windows Phone or Tizen oriented friends.
Also, as a developer, not having to develop a native application per each OS out there would be a big plus.
Unfortunately today is not that day, so, if I want to deploy an application on each and any OS, giving my users a “native experience”, I have to write a native application per each of them. Right? Not exactly.
At least in the mobile world PhoneGap comes to the rescue making it possible to create a pure HTML+CSS+JS application and having it packed as a native application for all of the major mobile systems.
Using their online building tool (namely PhoneGap:Build) you don’t even need to setup a development environment per each target OS as it was previously necessary: simply prepare your code, upload it to their website and download the packed applications, that’s it!
The best part is, you can now use the Lightstreamer JavaScript Client 6 and its companion Lightstreamer Server 5 to enable real-time goodness on you PhoneGap application.
So, let’s try it!
Coding
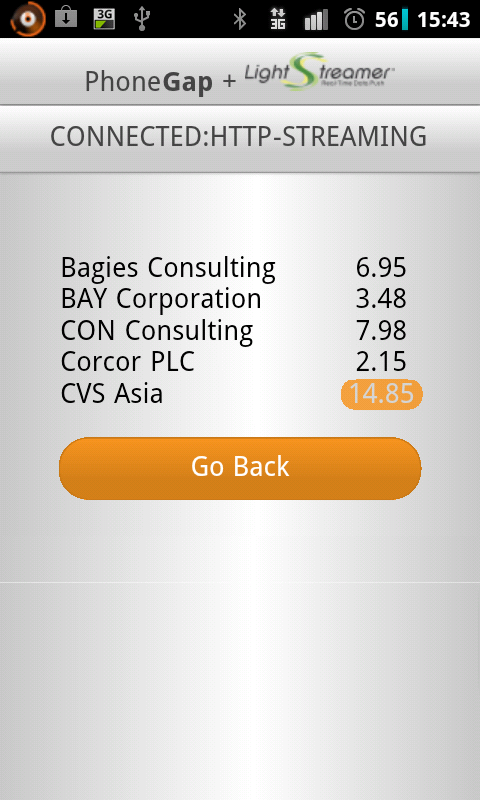
PhoneGap offers a sample application to get you started and we’ll use it as our starting point. We’ll add some stock quotes from our classic StockListDemo and a box to show the status of the connection to the Lightstreamer Server.
As we will not use all of the classes from the Lightstreamer JS Client let’s start by customizing it via our generator tool: select LightstreamerClient, Subscription and DynaGrid, then choose the “Use globals” option and generate the lib. (note that you can use the AMD version too, we just want to avoid including an AMD loader in this simple example).
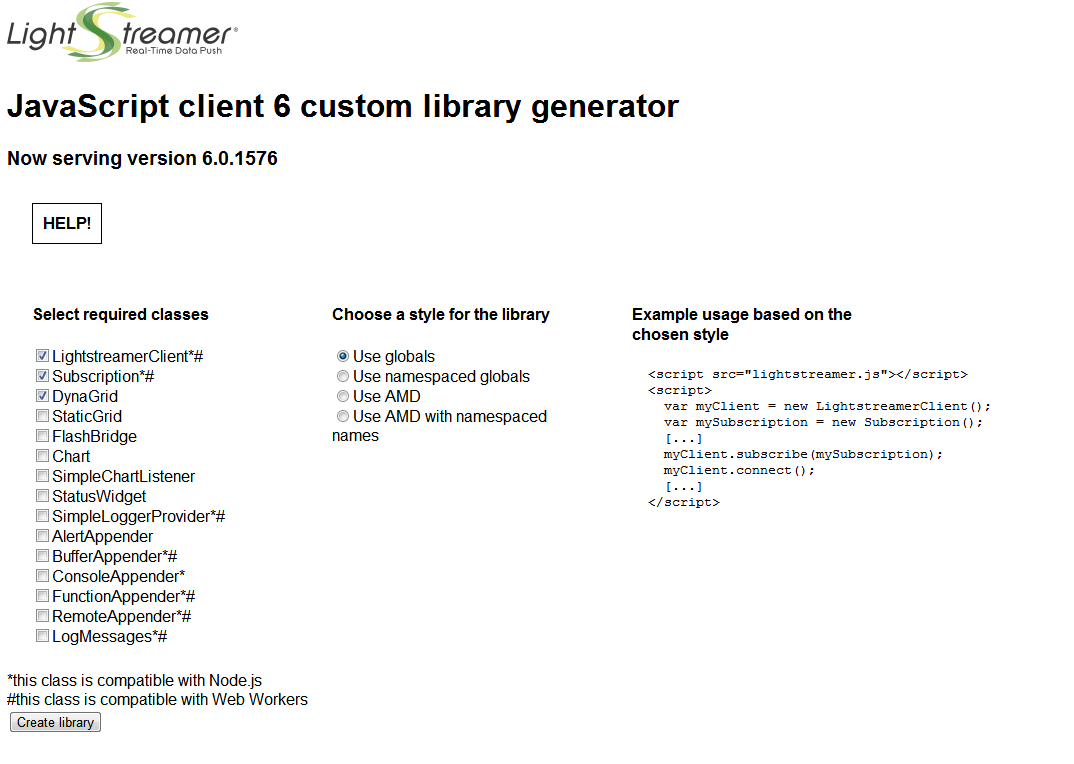
Once the generated library is saved as assets/js/lightstreamer.js and included in the index.html file we can start coding
<script src="assets/js/lightstreamer.js" type="text/javascript" charset="utf-8"></script>First of all I adapted a little bit the application to avoid the use of the ids of the “button” elements as “command orders”, I added a new navigation button and related section that will contain the Lightstreamer grid and edited the config.xml to add references to Lightstreamer. I will skip the details about these parts as not relevant here.
Then I added some Lightstreamer code to the application. I wanted my application to be always connected to a Lightstreamer server, so I included my connection logic in the callback sent to the run method in the app.js file. Such run method, declared in the dsl.js file, will execute the given callback as soon as PhoneGap is ready.
For such connection to be opened simply instantiate a LightstreamerClient object, specifying the server address and the adapter-set to be used, and call the connect function. In this case I also added a listener to my LightstreamerClient: each time the connection status will change it will be reported in the “connection_status” <div> element I added to the html page.
in the app.js file:
run(function () {
  [...]
var lsClient = new LightstreamerClient("http://push.lightstreamer.com","DEMO");
  lsClient.addListener({
    onStatusChange: function(newStatus) {
       x$("#connection_status").html(newStatus);
    }
  });
  lsClient.connect();
in the index.html page:
<div id="connection_status">DISCONNECTED</div>
Once connected we need to subscribe to our stock data and we also want a grid to show such data.
I included a DynaGrid template in the html page in the form of a <li> element (notice the id of the <li> element, the data-source and the data-field properties) and then created the related JS code.
A listener of the DynaGrid instance will take care of configuring the highlighting of the cells. We also want the grid to be sorted on the stock_name field.
in the index.html page:
<li id="stocks" data-source="lightstreamer">
  <span class="stock_name" data-source="lightstreamer" data-field="stock_name"></span>
<span class="last_price" data-source="lightstreamer" data-field="last_price"></span>
</li>
in the app.js file:
var grid = new DynaGrid("stocks",true);
grid.setSort("stock_name");
grid.addListener({
  onVisualUpdate: function(key,info) {
if (info == null) {
      return; //cleaning
    }
    info.setHotTime(500);
    info.setHotToColdTime(300);
    info.setAttribute("#F7941E", "transparent", "backgroundColor");
    info.setAttribute("white", "black", "color");
  }
});
I created and configured a Subscription, added the previously created grid as a listener for its updates and subscribed to to the Lightstreamer Server through the LightstreamerClient.
I could have specified the list of fields to be subscribed to manually but in this case I preferred to read such list from my grid template; extending the template with a new cell for a different field will automatically expand the list of subscribed fields. Also extending the list of items to be subscribed to will make the grid grow vertically.
var sub = new Subscription("MERGE",["item3","item4","item5","item6","item7"],grid.extractFieldList());
sub.addListener(grid);
sub.setDataAdapter("QUOTE_ADAPTER");
sub.setRequestedSnapshot("yes");
lsClient.subscribe(sub);
That’s it!
The full source code of the application shown here is available on my GitHub account; go to https://github.com/Mone/phonegap-start and check it out.
Building
Now that the application code is ready we have to build it, head for the previously cited PhoneGap:Build and login: you can use an Adobe ID or a GitHub account to authenticate on the site, if you have none you’ll have to create one (my personal suggestion is to pick the GitHub option).After the first login PhoneGap asks to create an application; simply fill the name input box for the application and the address of your (or mine) GitHub project, sit and wait, your application is being built!
Hey! What about Websockets?
The Lightstreamer JS library will open a WebSocket to a Lightstreamer Server if a WebSocket implementation is made available by the hosting platform.In this case the library counts on PhoneGap for such implementation to be available. PhoneGap in turn relies on the hosting OS’s browser for the WebSocket class to be available so that, by default, as of today, you will not get a WebSocket connection on most phones.Obviously the Lightstreamer JavaScript Client will resort to HTTP-STREAMING if Web Sockets are not available on the platform: when using Lightstreamer you never have to worry, we got your back. Note: a WebSocket implementation can be injected into PhoneGap via plugin but it will be OS dependant. Note that for the implementation to play nice with Lightstreamer Server it has to adhere to RFC 6455.
Don’t like PhoneGap and/or JavaScript development?
If you still prefer pure-native apps, we offer Lightstreamer client libraries for a plethora of technologies; talking about the mobile world we offer SDKs for iOS, Android, Blackberry, Windows Phone and J2ME-enabled devices. Also our protocol is fully documented so you can potentially use Lightstreamer on any device.
