Introduction

Most MQTT brokers currently available on the market provide native support for WebSockets, thus enabling any MQTT JavaScript library to establish communications by encapsulating MQTT messages into WebSocket frames: this is called MQTT Over WebSocket.
The great benefit of this approach is to allow all modern browsers, including those running on smartphones, to send and receive MQTT messages. This has the effect of stretching out the protocol to the web, making it more and more attractive for M2H (machine to human) scenarios too.
However, the Internet unpredictability in terms of packet loss and available bandwidth, especially over mobile networks, makes this “dumb pipe” approach quite unreliable. For example, it might be both unfeasible and useless to send all big real-time data produced by IoT sensors to browser based applications and mobile apps, due to the risk to overload the network, the browser, and the user… In these cases, dynamic throttling is the key. The data that flows over WebSockets should be throttled to adapt to the available bandwidth with resampling. This way, different clients subscribed to the same high-frequency MQTT topics over different networks would all see up-to-date data, even with tiny bandwidth connections.
MQTT.Cool beyond WebSockets
Being an optimized gateway that lies between web clients and brokers, MQTT.Cool (now known as the Lightstreamer MQTT Connector) is able to make real-time data flow more effective. Furthermore, if your infrastructure does not support WebSockets (for example, due to transparent proxies or strict corporate firewalls which block them), MQTT.Cool automatically chooses the best transport for each client, possibly falling back to HTTP Streaming and HTTP Long Polling: with MQTT.Cool, WebSocket is no longer the only way to connect to an MQTT broker from the web.
By applying data throttling through special techniques such as queuing, resampling, and conflation, MQTT.Cool dynamically optimizes messages flow, no matter what transport is being used.
Data can be throttled in two different ways:
- Adaptive throttling, by which MQTT.Cool automatically resamples the data on the fly while applying conflation to adapt to any network congestion.
- Client-controlled throttling, by which each client can explicitly configure a maximum bandwidth for its downstream channel, as well a maximum update frequency for every fanout subscription.
You can find more on fanout subscriptions on the Getting Started Guide; but for the sake of completeness:
- A shared connection is a single broker connection from MQTT.Cool to the MQTT broker, on the top of which different MQTT.Cool clients are tunneled and multiplexed.
- Similarly, a fanout subscription is a single MQTT subscription done by MQTT.Cool on the broker to manage all messages published on that topic and subscribed to by multiple remote MQTT.Cool clients.
Shared connections and fanout subscriptions are two primary mechanisms that enable any MQTT broker to achieve massive fan out on the web.
MQTT.Cool offers great flexibility and high level of optimization because it is based on Lightstreamer, the high-performance server used by a large base of top-tier customers around the world to deliver real-time data across the web efficiently and reliably.
A Showcase for MQTT Throttling
To better illustrates how throttling is managed by MQTT.Cool, we created the MQTT Throttling Demo, which focuses on client-controlled throttling. The demo was built in collaboration with our friends from Gambit Communications, which helped us with their powerful MIMIC MQTT Simulator as will be described later on.
The demo shows how easy it is to build a web client that manages real-time telemetry and, very important, how incoming flow of messages can be further manipulated in terms of bandwidth and frequency.
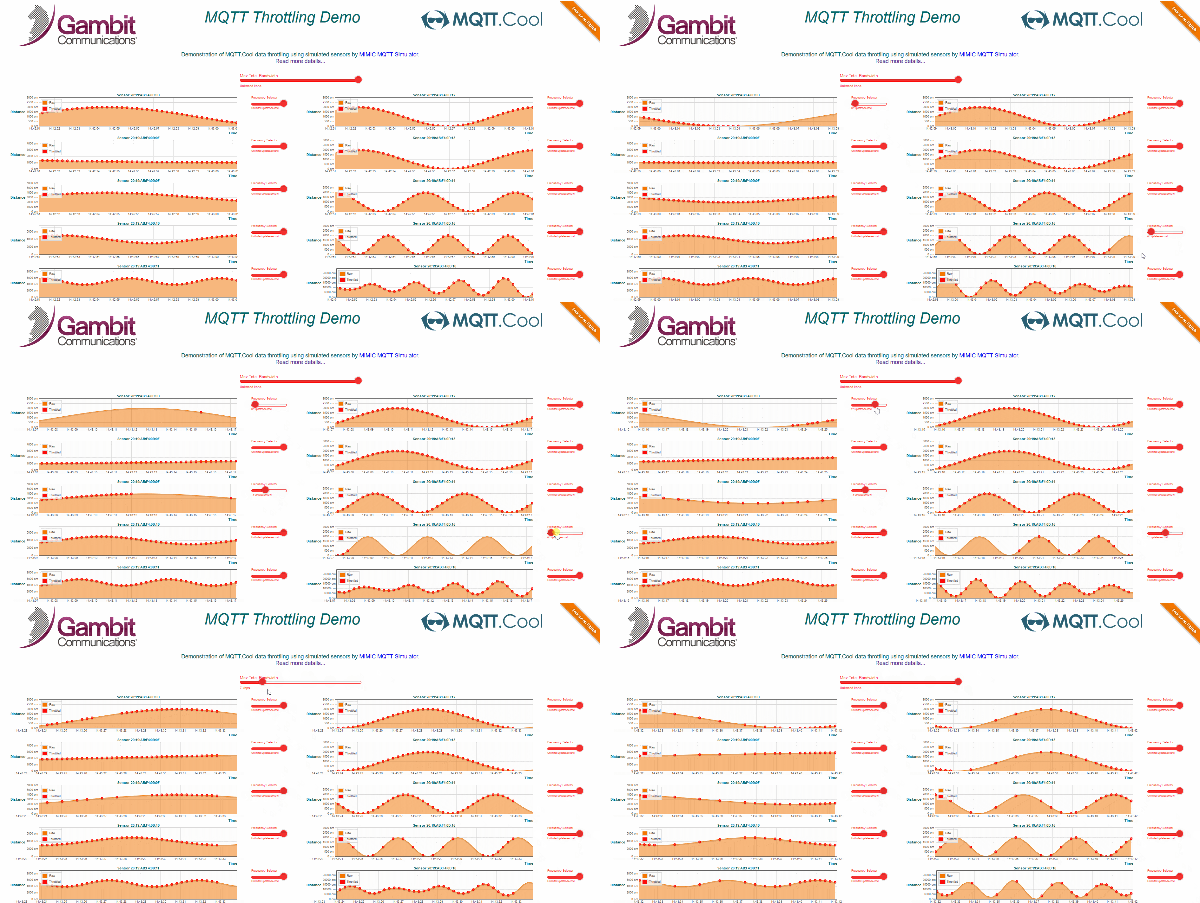
The client visualizes real-time updates coming from ten different IoT sensors, which continuously detect and publish to the MQTT broker the distance between themselves and moving objects.
To make the difference between throttled and non-throttled data clear, for each sensor two graphs are displayed: with red points for throttled data and with an orange line for non-throttled data.
Moreover, the client lets you interact with the UI to accurately control the impact of throttling the data stream both globally and individually, as depicted below.
Control the Frequency
For each frame, you can handle a slider to dynamically change the maximum update rate at which incoming messages related to the sensor can arrive. This impacts the frequency at which the red points are displayed on the frame, as you can see from the following animation, where the frequency selector has been moved from “unlimited” to “1 update/sec“, and then to “3 updates/sec”.

Control the Bandwidth
In the same way, at the top of the page a selector allows you to change the bandwidth used by all subscriptions, affecting the overall frequency of all red points rendered in all frames. In the below animation, the bandwidth selector has been changed from “ulimited kpbs” to “5 kpbs“, and then to “15 kbps”:
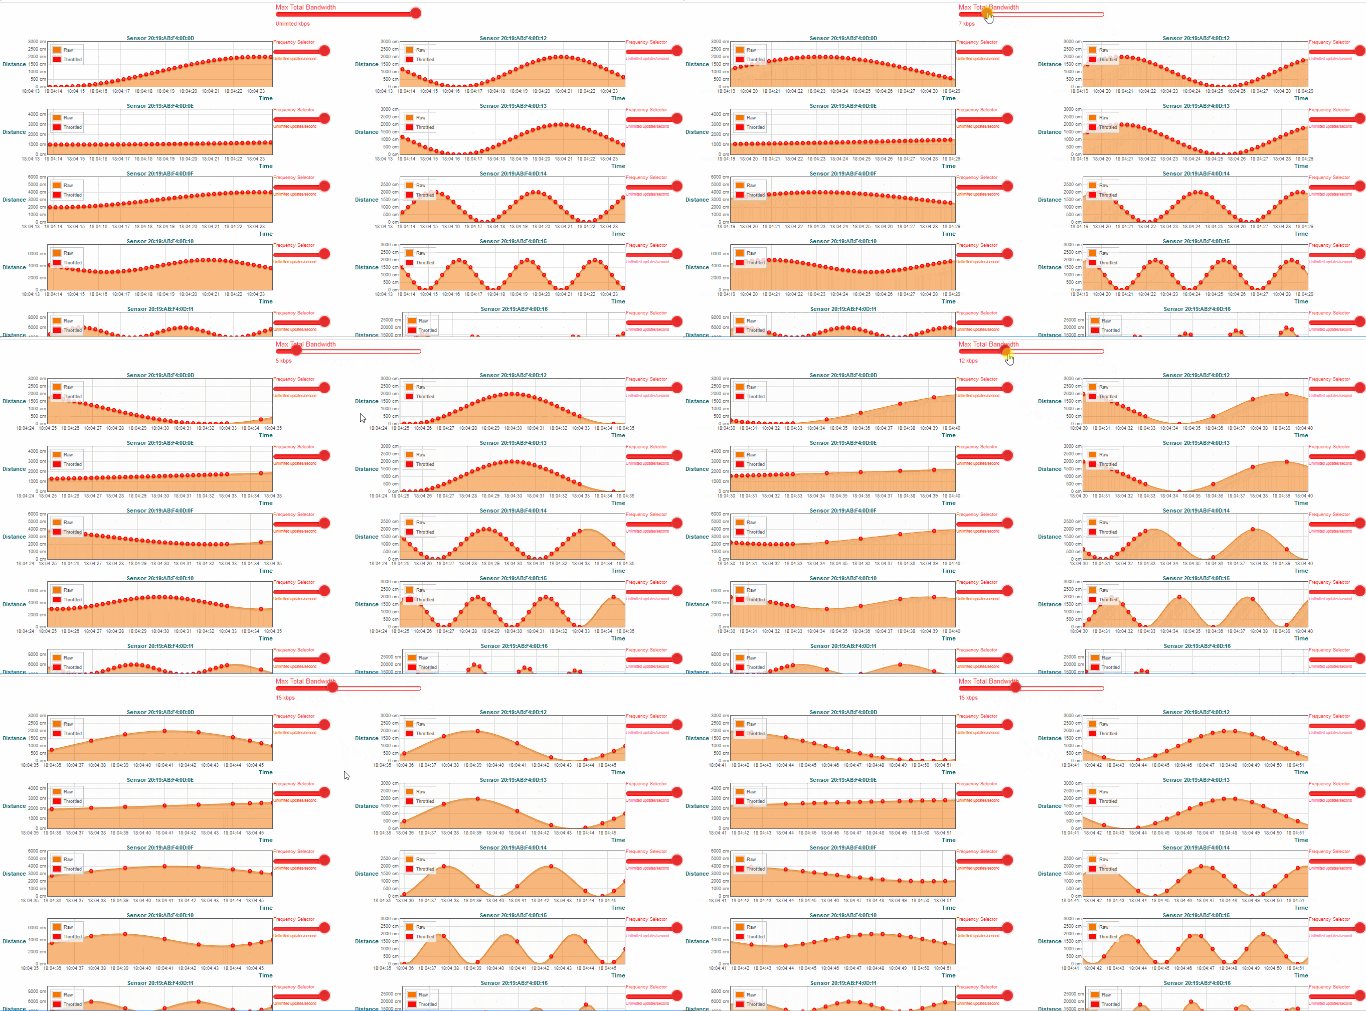
Interacting with the UI helps you realise how the bandwidth and frequency constraints set an upper bound, dynamically managed by MQTT.Cool, on different levels: the bandwidth constraint is globally applied to the connection, whereas the frequency constraint is applied to each MQTT subscription individually.
Note that real-time updates are neither buffered nor delayed, but resampled and conflated. In other words, when a subscription has a chance to be updated (based on a round-robin algorithm), it will receive the very latest available message, not an old one.
Architecture of the Demo
The following diagram shows the overall architecture employed to build the demo:
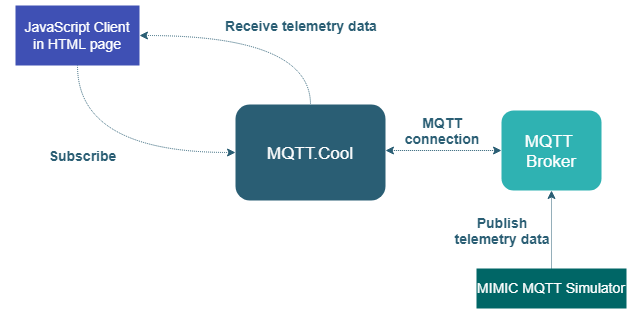
The Subscriber
By using Web Client API, the JavaScript client submits an MQTT subscription for each sensor/topic to receive real-time data and displays them on the relative chart.
Use of the Web Client API is necessary, as MQTT.Cool does not “speak” pure MQTT with web clients: it transparently remaps the MQTT protocol over the Lightstreamer protocol to take benefit from the capacity of Lightstreamer to move high volumes of data through the web. This means that you have native MQTT clients directly connected to the MQTT broker from one side, and web clients connected to MQTT.Cool through the Web Client API from the other side.
The Publisher
As already anticipated, we leveraged the flexibility and power offered by MIMIC MQTT Simulator, by which it is extremely easy to produce an unlimited range of simulated scenarios, as it is capable of generating arbitrary, customizable, scalable and predictable telemetry.
Gambit guys deployed the simulated IoT sensors on their MQTT Lab to publish distance variations generated as sine waves, each one with a different frequency to show different traffic patterns.
The Broker
The MQTT broker is hosted on our cloud infrastructure, listening at tcp://broker.mqtt.cool:1883. Speaking of this, being the broker publicly accessible, feel free to use it for any testing purpose!
The Gateway
Acting as an intermediary between the Subscriber and the Broker, the MQTT.Cool server takes the role of a real web gateway. The live version of the demo connects to https://cloud.mqtt.cool, which is the address of our online MQTT.Cool instance. As detailed further on, you can replace it with your own instance in your local copy of the demo.
Dig the Code
The demo is based on jQuery and, as stated before, has been developed by using the MQTT.Cool Web Client API, with the support of two more small libraries:
- Flotr2 for graphs rendering.
- rangeslider.js for slider visualization and manipulation.
Let’s start by examining some interesting code fragments taken from the js/app.js file, where all the application code is defined.
Host Addresses
At the top of the file, you can find the addresses of the MQTT.Cool server and the MQTT broker:
$(function() {
  // Define urls for MQTT.Cool and the external MQTT broker.
  const MQTT_COOL_URL = 'http://localhost:8080';
  const BROKER_URL = 'tcp://broker.mqtt.cool:1883';
  ...
})
If you want to clone the project on your laptop and target a different MQTT.Cool server, please replace the MQTT_COOL_URL constant according to your environment.
Please note that the same does not apply to the MQTT broker, because MIMIC Simulator is currently publishing data to our cloud broker.
Sensors
After defining other variables, the simulated remote IoT sensor is abstracted by the Sensor constructor function, which is identified by a sensor id and a frame id:
- The sensor id is used to form the topic to which telemetry data will be published by MIMIC Simulator for that simulated sensor. The topic is used to submit the MQTT subscription.
- The frame id is used to look up the area on the HTML page devoted to rendering the animated graph.
function Sensor (sensorId, frameId) {
  this.sensorId = sensorId;
  this.frameId= frameId;
  this.topic = '/gambit/' + this.sensorId + '/telemetry';
  ...
}
The following array lists all Sensors supplied by Gambitt:
const SENSORS = [
  new Sensor('20:19:AB:F4:0D:0D', 'sensor1'),
  new Sensor('20:19:AB:F4:0D:0E', 'sensor2'),
  new Sensor('20:19:AB:F4:0D:0F', 'sensor3'),
  new Sensor('20:19:AB:F4:0D:10', 'sensor4'),
  new Sensor('20:19:AB:F4:0D:11', 'sensor5'),
  new Sensor('20:19:AB:F4:0D:12', 'sensor6'),
  new Sensor('20:19:AB:F4:0D:13', 'sensor7'),
  new Sensor('20:19:AB:F4:0D:14', 'sensor8'),
  new Sensor('20:19:AB:F4:0D:15', 'sensor9'),
  new Sensor('20:19:AB:F4:0D:16', 'sensor10')
];
Message Handling
A MessageHandler processes messages received from the MQTT subscription and forwards them to the right local Sensor object:
const MessageHandler = function (sensorType) {
  return function (message) {
    ...
  };
}
Once instantiated, this constructor function will return the callback that will be invoked upon receiving a Message instance (the message parameter).
To identify which simulated remote sensor has originated the message, we simply iterate over all SENSORS items until the only possible topic (as previously defined) does not match the Message.destinationName of the received message:
const sourceSensor = SENSORS.find(function (s) {
  return s.topic == message.destinationName
});
As MIMIC Simulator has been configured to publish payloads as JSON strings, we parse the Message.payloadString field to get back the JSON object:
const payload = JSON.parse(message.payloadString);Lastly, the Sensor object is triggered to update the chart looked up by the sensorType (“throttled” or “raw” according to the client the MessageHandler is associated with), passing the value carried by the payload:
sourceSensor.update(sensorType, payload);Here is how MessageHanlder looks like as a whole:
const MessageHandler = function (sensorType) {
  return function (message) {
    const sourceSensor = SENSORS.find(function (s) {
      return s.topic == message.destinationName;
    });
    const payload = JSON.parse(message.payloadString);
    sourceSensor.update(sensorType, payload);
  };
}
Now let’s step through connection and subscriptions.
Connection and Subscriptions
First of all, we have to open a new session against the gateway:
mqttcool.openSession(MQTT_COOL_URL, 'demouser', '', {

 onConnectionSuccess: function (mqttCoolSession) {
   ...
 },
 onLsClient: function (lsClient) {
   ...
 }
}
Here, demouser is the username required by our online server for all the deployed live demos (an empty password must be supplied in this case).
The last argument is an implementation of the MQTTCoolListener interface, which is notified of the events related to the session creation.
The mandatory onConnectionSuccess callback is triggered once the connection to MQTT.Cool successes. This is the place where usually an MQTT connection happens: the supplied mqttCoolSession parameter, indeed, provides the entry point to create an MqttClient instance configured to connect to the broker at the specified address:
throttledClient = mqttCoolSession.createClient(BROKER_URL);The client is then associated with a MessageHandler instance for dispatching messages that can be throttled. For doing that, we set the MqttClient.onMessageArrived callback:
throttledClient.onMessageArrived = new MessageHandler('throttled'); Finally, we can connect to the broker and, once connected, subscribe to each sensor’s topic:
throttledClient.connect({
  onSuccess: function () {
    for (var i = 0; i < SENSORS.length; i++) {
      throttledClient.subscribe(SENSORS[i].topic);
    }
  }
});
Following is the complete version of onConnectionSuccess:
onConnectionSuccess: function (mqttCoolSession) {
  throttledClient = mqttCoolSession.createClient(BROKER_URL);

  throttledClient.onMessageArrived = new MessageHandler('throttled');

  throttledClient.connect({
    onSuccess: function () {
      for (var i = 0; i < SENSORS.length; i++) {
        throttledClient.subscribe(SENSORS[i].topic);
      }
    }
}
For an in-depth discussion about making connections with MQTT.Cool, have a look at Section “The MQTT.Cool Connection Pattern” of the Getting Started Guide.
Underlying API
Because we also want to manipulate the global bandwidth, we must leverage the LighststreamerClient object, the entry point of the Lightstreamer Web Client API, on top of which the MQTT.Cool Web Client API is built.
This object manages all the communications between clients and the MQTT.Cool server and for each MQTT.Cool session a corresponding LightstreamerClient object exists.
Through this object, we can explicitly change the bandwidth at our convenience; but we first have to cache the reference for using it later. This is where onLsClient comes help us:
onLsClient: function(lsClient) {
  lightstreamerClientReference = lsClient
}
Frequency Management
Now, let’s investigate how the application allows you to modify the maximum update frequency for a given IoT Sensor.
The Sensor constructor function we have seen before also defines an inner function (initFrequencySelector), which sets the initial value of the associated selector. More important, the function accepts a callback to be invoked every time you move the slider to select a new value:
function Sensor(sensorId, frameId) {
  ...
  // Initialize the Frequency Selector of this IoT Sensor
  function initFrequencySelector(callback) {
    ...
  }

  // Trigger the Frequency Selector initialization passing the callback
  initFrequencySelector(function(subOptions) {
    throttledClient.subscribe(self.topic, subOptions);
  });
}
The callback simply resubmits the subscription to the same topic but providing a different SubscribeOptions object (the subOpts parameter), which carries the updated maxFrequency value as supplied by the selector.
onSlideEnd: function (position, value) {
  ...
  const subOptions = {};
  if (value !== 'Unlimited') {
    subOptions['maxFrequency'] = value;
  }
  onSlideEndCallback(subOptions);
}
Upon resubscribing, messages start flowing at the specified rate.
Bandwidth Management
The logic of updating the bandwidth is similar, but this time you have to play with the cached LightstramerClient object, as anticipated above.
The initBandwidhtSelector function (defined in an outer scope) initializes the status of the global bandwidth selector and requires a callback that will be triggered when you handle the slider:
initBandwidthSelector(function (value) {
  lightstreamerClientRef.connectionOptions.setMaxBandwidth(value);
});
The maximum allowed bandwidth available for all subscriptions changes
instantaneously by calling the LightstreamerClient.connectOptions.setMaxBandwidth method; soon after, you can see how this impacts all graphs, in which throttled sine waves start rendering at variable intervals on the basis of the band chosen through the selector.
Appendix “Access the Lightstreamer Client API” of the Getting Started Guide delves into the relationship between the two client-side APIs and shows you how to take other benefits from that.
Non-throttled Data
Manipulation of frequency and bandwidth has an effect only on incoming messages rendered as red points and therefore related to the MQTT subscriptions requested from the throttled client, as seen before.
But, visually comparing throttled data with raw data (that is, non-throttled data) help us to better understand how bandwidth and frequency really affect message flows.
This is why we used in the demo another type of MQTT.Cool connection, the Dedicated Connection, whose MQTT subscriptions receive data as they come from the MQTT broker without any further manipulation, which may be triggered by the client or the MQTT.Cool server. Messages flowing through this connection are displayed as continuous orange lines in the frame.
The following fragment shows connection and subsequent subscriptions made for the raw client:
mqttcool.openSession(MQTT_COOL_URL, 'demouser', '', {

  onConnectionSuccess: function (mqttCoolSession) {
    const clientId = 'client-' + new Date().getTime().toString();
    rawClient = mqttCoolSession.createClient(BROKER_URL, clientId);

    rawClient.onMessageArrived = new MessageHandler('raw');

    rawClient.connect({
      onSuccess: function () {
        for (var i = 0; i < SENSORS.length; i++) {
          rawClient.subscribe(SENSORS[i].topic);
        }
      }
    });
});
The pattern employed is the usual one. In fact, the code snippet is alike the throttle case, but with the two significant differences that we have highlighted:
- Lines 4-5: the client identifier (although not pretending to be unique across all possible clients) provokes the session to return an MQTT client that will trigger a dedicated broker connection on the server side.
- Line 7:
MessageHanldernow is instantiated with raw as sensor type, thus addressing the corresponding chart type, which is the orange line.
Conclusion
The demo shows basic techniques you can use to improve the management of MQTT streams with good control over frequency and bandwidth of the messages flow. This has been made possible by the underlying Lightstreamer technology, which allows to allocate both the desired frequency for each subscription and the total bandwidth for the whole connection, also guaranteeing to never exceed demanded values.
In the near future, new API extensions (without breaking the Paho-like design) will make client-controlled throttling even easier through the following improvements:
- Ad hoc additions to
SubscribeOptionsfor controlling the frequency, making resubscribing no longer necessary. - Direct control over bandwidth via explicit operations exposed by
MQTTCoolSession.
Enjoy MQTT messaging with MQTT.Cool and stay tuned!

